
Installation Guide
K9 ROOF RACK FOR TOYOTA 3RD GEN TACOMA DOUBLE CAB PICKUP
SIZES
This guide works for the following Eezi-Awn K9 Roof Rack Sizes:
- 1.4M x 1250mm
- 1M x 1250mm
- 700mm x 12500mm
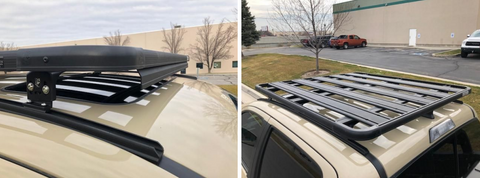
- K9 Roof Rack Platform
- K9 Roof Rack Feet
- K9 Roof Rack Mounting Rail
- Mounting Rail Hardware (Including Bolts and Spacers)
OVERVIEW
The Toyota 3rd Gen Tacoma Double Cab comes with five (5) mounting points per side: two (2) to the front, one (1) center, and two (2) to the rear. All points are located under the pinch weld rubber trim on each side of the roof line. They are either covered with foil tape or exposed by the installation of an OEM rack. The number of holes necessary to install the K9 Roof Rack System will depend on the size and location of the platform being installed.
The broad scope of our installation is to install the K9 Roof Rack Mounting Rail to the top of the pinch weld trim on each side of the roof, then install a series of K9 Roof Rack Feet to the Mounting Rail following by the K9 Roof Rack Platform atop of the Feet.
STEP BY STEP
A. Install K9 Roof Rack Mounting Rail to Tacoma Roof
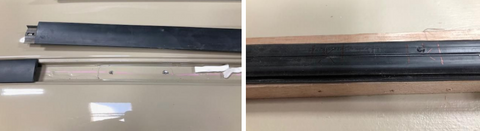
- Remove pinch weld trim, turn upside down, and lay it next to the pinch weld.
- Measure to the center of each mounting point location necessary for your specific rack (from rear of trim forward) and mark those locations on the pinch weld trim.
NOTE : There are extra holes in the mounting rail. Measure only for the mounting points in your roof, not for every hole in the mounting rail. Applications vary.
- Measure and mark 12mm (1/2”) forward and rear of each mounting point mark.
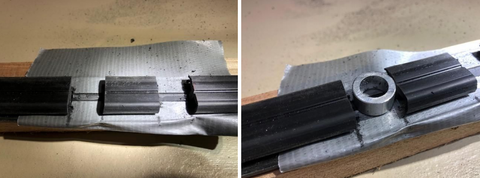
- The pinch weld trim needs to be trimmed to make room for an aluminum spacer to fit under to top surface of the trim. There is a small metal strip buried inside the pinch weld trim that needs to be cut and removed in each of the locations where the spacers will fit.

- Once the lower portion of the pinch weld trim is removed, the spacers will fit under the top of the trim.
- Drill a hole through the pinch weld trim at each of the mounting point locations to accept the M6 stainless button head cap screw. Make the hole slightly larger than the diameter of the bolt for ease of fitment.
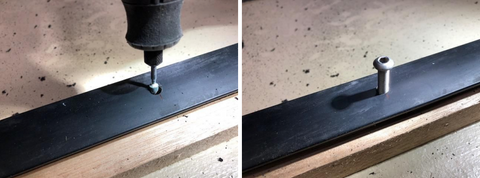
- The M6 bolt will go through the pinch weld trim, through the spacer, and into the threaded mounting point in the roof of the truck.

- Test fit all the components in place to ensure that they align correctly. Locate spacers over mounting points, place pinch weld trim over the spacers and secure in place, locate mounting rail over pinch weld trim and align with holes, insert bolts and ensure a proper alignment with mounting point threads. Adjust holes in mounting rail and/or pinch weld trim as necessary to ensure bolts fit in threads in roof accurately.
- The threaded mounting points in the roof are the only possible spots for water ingress under the pinch weld trim. To prevent water from finding it’s way inside the roof, put a sufficient dollop of clear silicone over the mounting point hole and then put the spacer into the silicone over the hole.

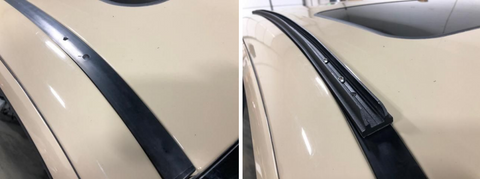
- Return the pinch weld trim over the spacers and push down in place. Lay mounting rail over the top of the pinch weld trim and align holes. Insert bolts and start all bolts in threads before tightening. The goal is to tighten bolts secure enough to ensure solid mounting, but not so tight that the pinch weld trim starts to warp or the mounting rail starts to recess to much. The goal is for the mounting rail to mimic the curve of the original pinch weld trim.

B. Install K9 Feet and Platform to Mounting Rail
- Depending on the application, you will have four (4) or six (6) K9 Feet to install.
NOTE : The goal is to end up with a roof rack that is flat on the top of the truck, not tipping forward or rearward. The slope of the roof tapers downward at the front, so the taller feet are oriented toward the front with the shorter feet toward the center and back.
- Loosen the M6 bolts on the base of the K9 Foot so they can pass over the button head cap screws inside the mounting rail and slide the base of the feet into the mount rail. Locate the feet front/center/rear initially, as best you can (eye them for now). Remove the M8 bolts and nuts from the horizontal top portion of the feet.
- Remove the K9 Platform from its packaging and turn upside on a soft surface. Attach the supplied wind deflector to the front edge of the platform bottom utilizing the routered slots between the front edge and the first cross brace.
NOTE : This can be done with the wind deflector facing forward or rearward, depending on your preference. Deflector is facing forward in image below.
- Insert the M8 bolts you removed from the feet tops into the T slots on the bottom of the rack (two per foot location). This is done by tipping the head of the bolt at a 45-degree angle to the T slot and inserting the head in the routered notch in the slot. If it doesn’t fit one way, turn the head the opposite direction and try again. One direction or another, the head will slip into the T slot. Orient the bolts to mimic the location of the holes on the top of the K9 feet.
- Invert the platform and raise it over the cab roof line. Lower the platform slowly onto the K9 feet, adjusting the location of the feet and the bolts in the bottom of the platform until the platform lands on top of the feet with the bolts going through each foot for fastening.
- Attach washer and nut to the bottom of a bolts going through the feet tops. Ensure that the platform is level, even and square. Measure the distance from face of foot to edge of rack on each side of platform and make sure it is the same on both sides. Do this for the front two feet and the back two feet. This will make the platform square on your roof. Tighten nuts to platform first. Tip and tilt the platform until it is flat and tighten the hardware between the two-foot halves next. Lastly, tighten the M6 bolts in the base of the feet to secure them to the mounting rail!
- Your rack is complete!
“The logic and sequence is easy after a few reads, but unfortunately it takes a lot of words to explain! Don’t hesitate to reach out to us with any questions--we are always happy to help!”
-- Paul May, Founder & Owner of Equipt Expedition Outfitters